Volume 2: Scenario Configuration
Estimated time: 30–45 minutes Goal: Learn to configure your own detection scenarios using the system's built-in AI algorithms Prerequisites: Completed the Quick Start Guide (Volume 1); the system is up and running No extra equipment needed: This entire volume uses built-in demo videos — no camera required
Learning Path
We'll walk you through one complete hands-on scenario followed by one independent practice scenario to build your general-purpose configuration skills.
- Chapter 1 → Hard Hat Detection (full walkthrough — learn the basics of multi-model + region rules)
- Chapter 2 → Absence Detection (self-guided practice — learn multi-model combination + time-based judgment)
- Chapter 3 → Quick Reference for Other Scenarios (all 18 scenario tasks and their key differences)
After completing the first two chapters, you'll be able to independently configure any built-in algorithm as a detection scenario.
Chapter 1: Hard Hat Detection
Background: Construction sites involve elevated work and falling object risks. Hard hats are the most fundamental piece of personal protective equipment for frontline workers. Real-time AI detection catches violations immediately, preventing injuries and fatalities from falling debris, collisions, and falls.
Scenario: Monitor a construction site entrance, detect workers not wearing hard hats, and trigger automatic alarms.
Features involved: Video Source → Algorithm Assignment → Detection Region → Parameter Tuning → Live Preview → Alarm Records

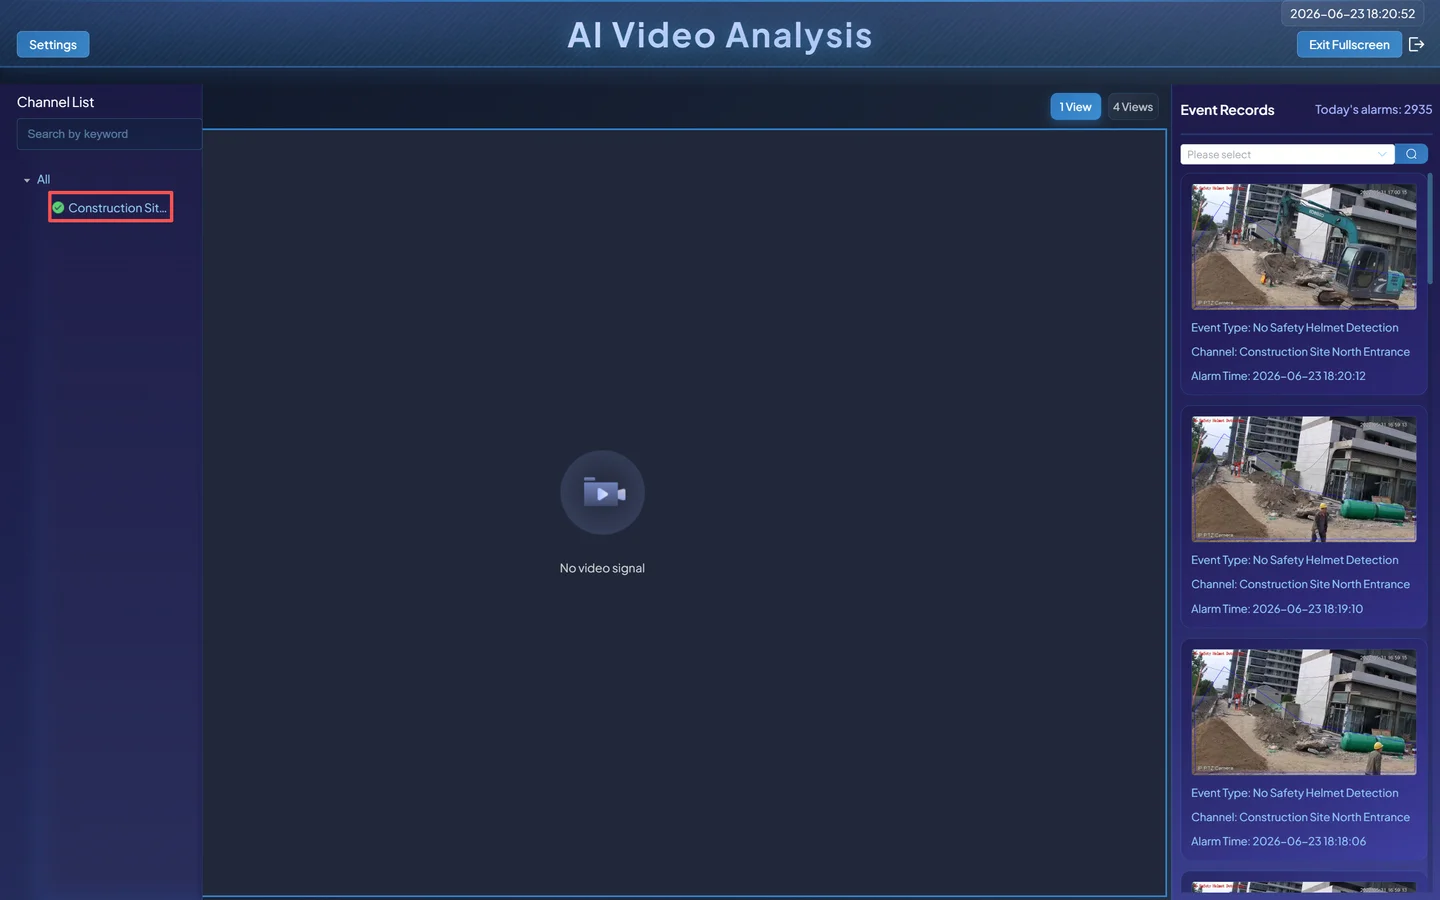
1.1 Prepare a Video Channel
Download the demo video
The project provides demo videos. Download link: github.com/cosmo-wander-ai/cosmo-edge/releases/tag/v1.0-videos
Upload the demo video
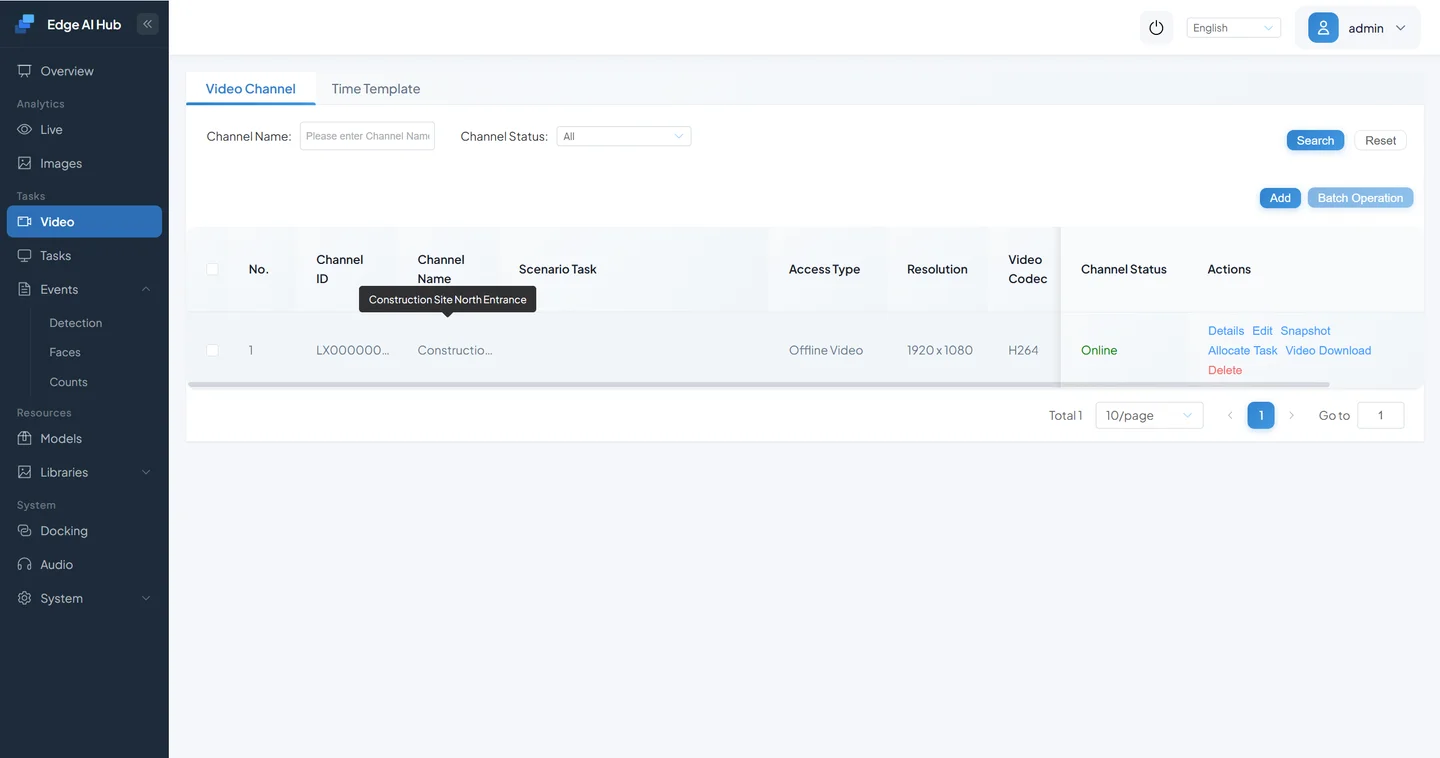
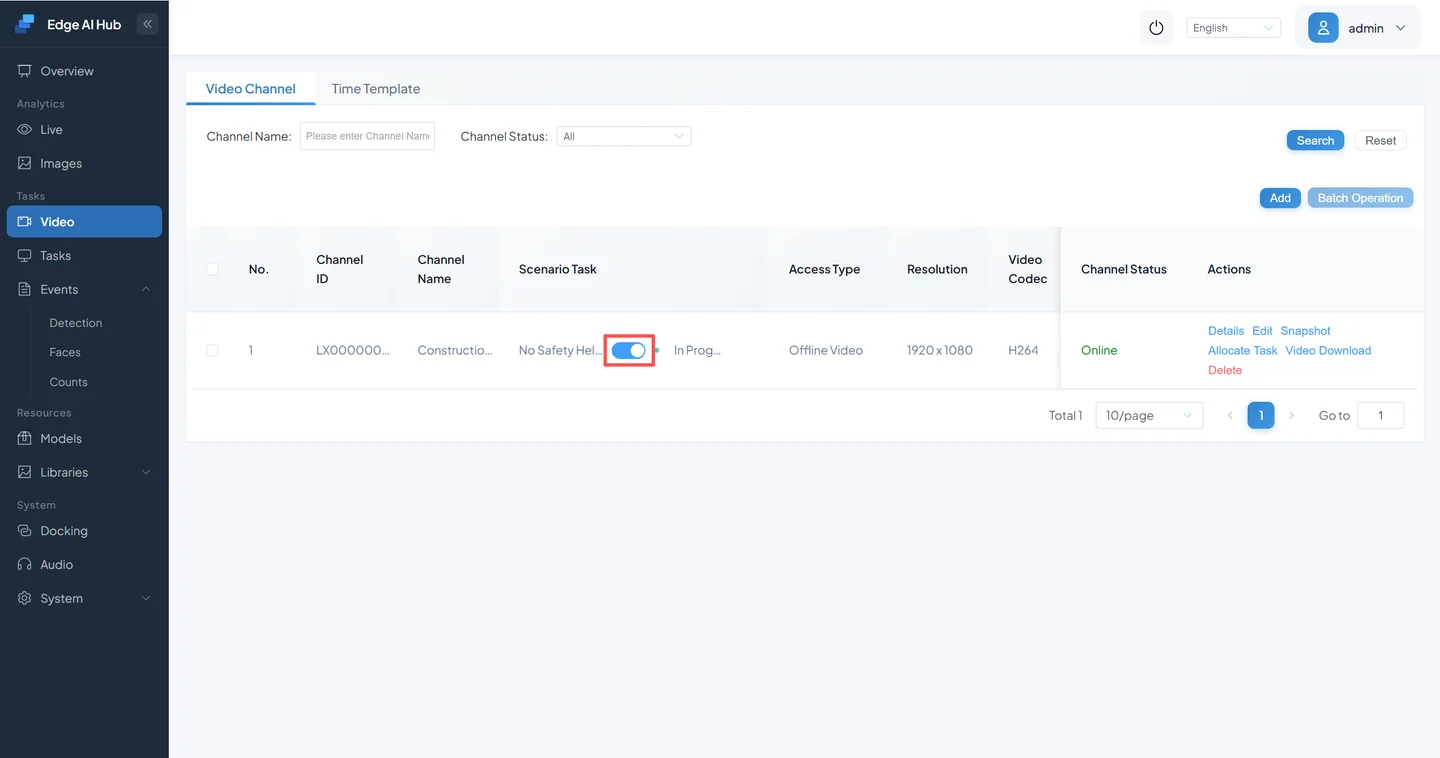
Click the Video Sources menu → Video Sources to open the video source page.
Click the Add button to open the Add Channel dialog.
- Source type: Offline Video
- Channel name: Give it a descriptive name, e.g., Construction Site North Entrance
- Upload video: Upload the demo MP4 file.
Click Save to create a new video channel.
1.2 Assign an Algorithm to the Channel
Bind the Hard Hat Detection algorithm to the video channel so the system begins analyzing the feed.
Assign the algorithm to the channel
Click Scenario Task Assignment to open the algorithm configuration page.

Select the No Hard Hat algorithm
Under All Services, find No Hard Hat and click to select it.

INFO
Additional note
The No Hard Hat algorithm's business logic can be found under Task Configuration → Scenario Tasks.

Click Pipeline Orchestration to view the detailed business logic.
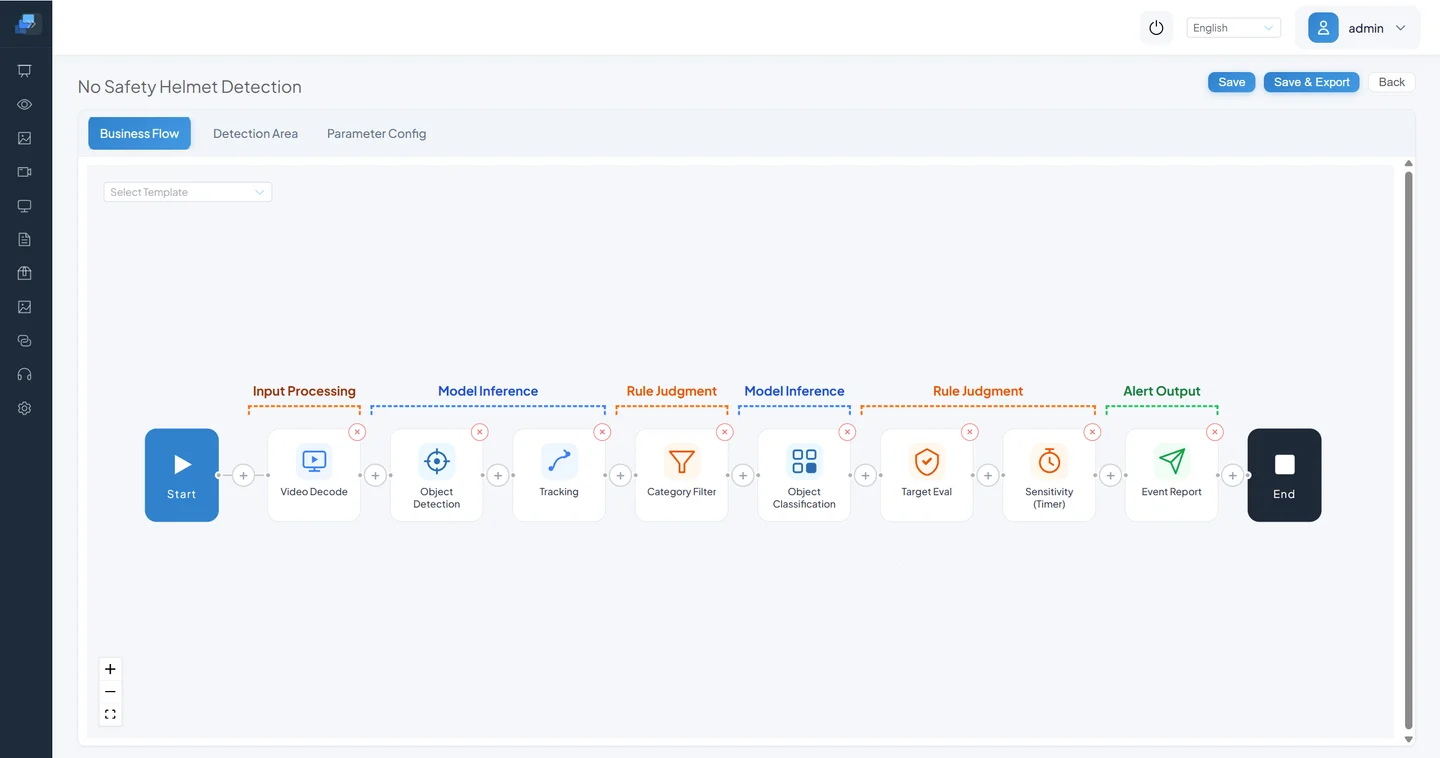
The business logic flows roughly as follows:
- Video Decode: Decode the incoming video stream.
- Object Detection: Use a pedestrian detection model to locate people.
- Tracking: Track each person across frames to maintain consistent identity.
- Category Filter: Filter out non-relevant object classes (if the detection model outputs multiple categories).
- Classification: Run a hard hat classifier on each detected person.
- Sensitivity Calculation: Apply alarm tolerance — instead of triggering on a single frame, require multiple consecutive detections above a hit-rate threshold.
- Event Reporting: Report the alarm event.
Different business scenarios have different priorities: some emphasize accuracy (minimizing false positives), while others emphasize responsiveness (triggering alarms as quickly as possible). By tuning the parameters within the pipeline, you can flexibly adjust the logic without modifying any code — one of this project's key strengths.
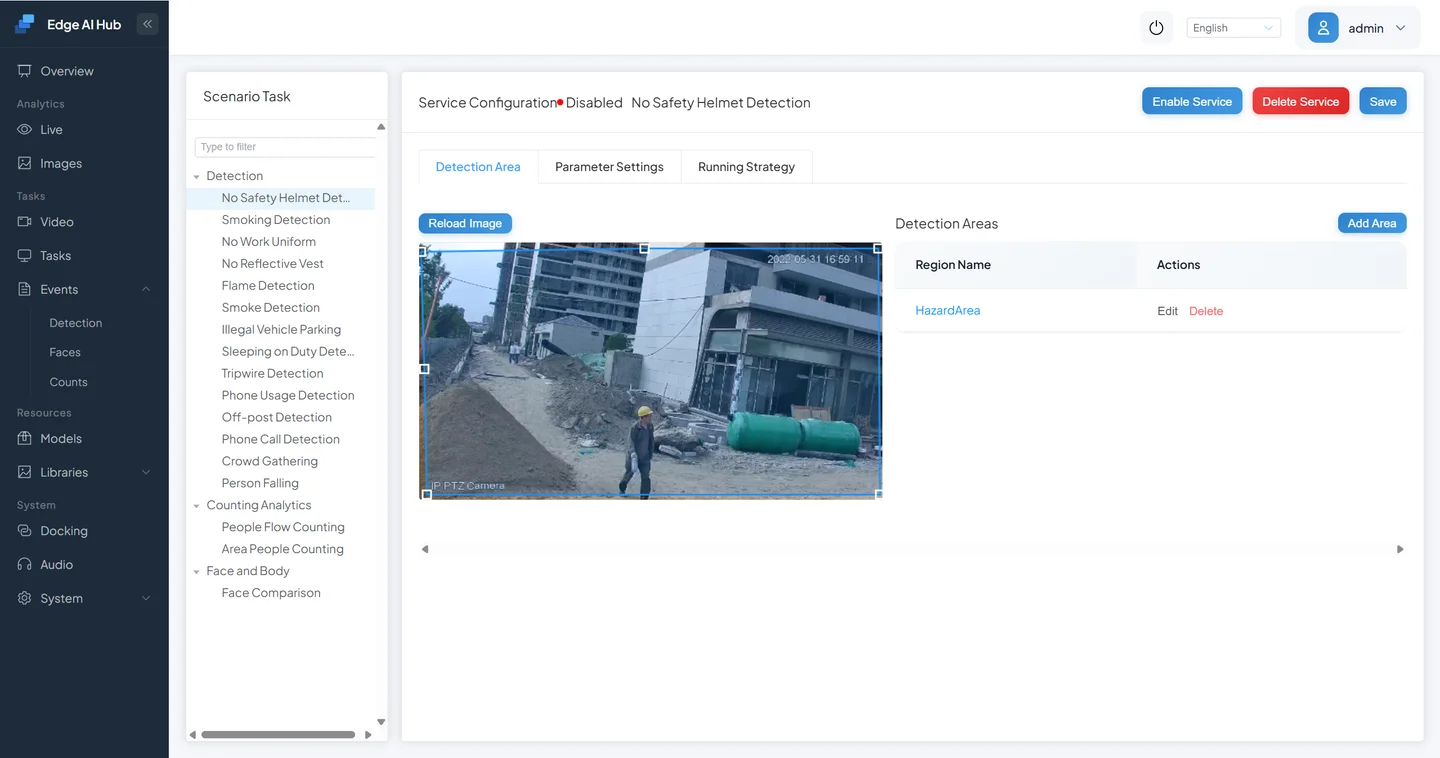
1.3 Configure the Detection Region
By default, the algorithm analyzes the entire frame. By setting up a Region of Interest (ROI), you can restrict analysis to specific areas, reducing false positives from irrelevant parts of the scene.
Add a detection region
Click Add Region to create a monitoring zone.
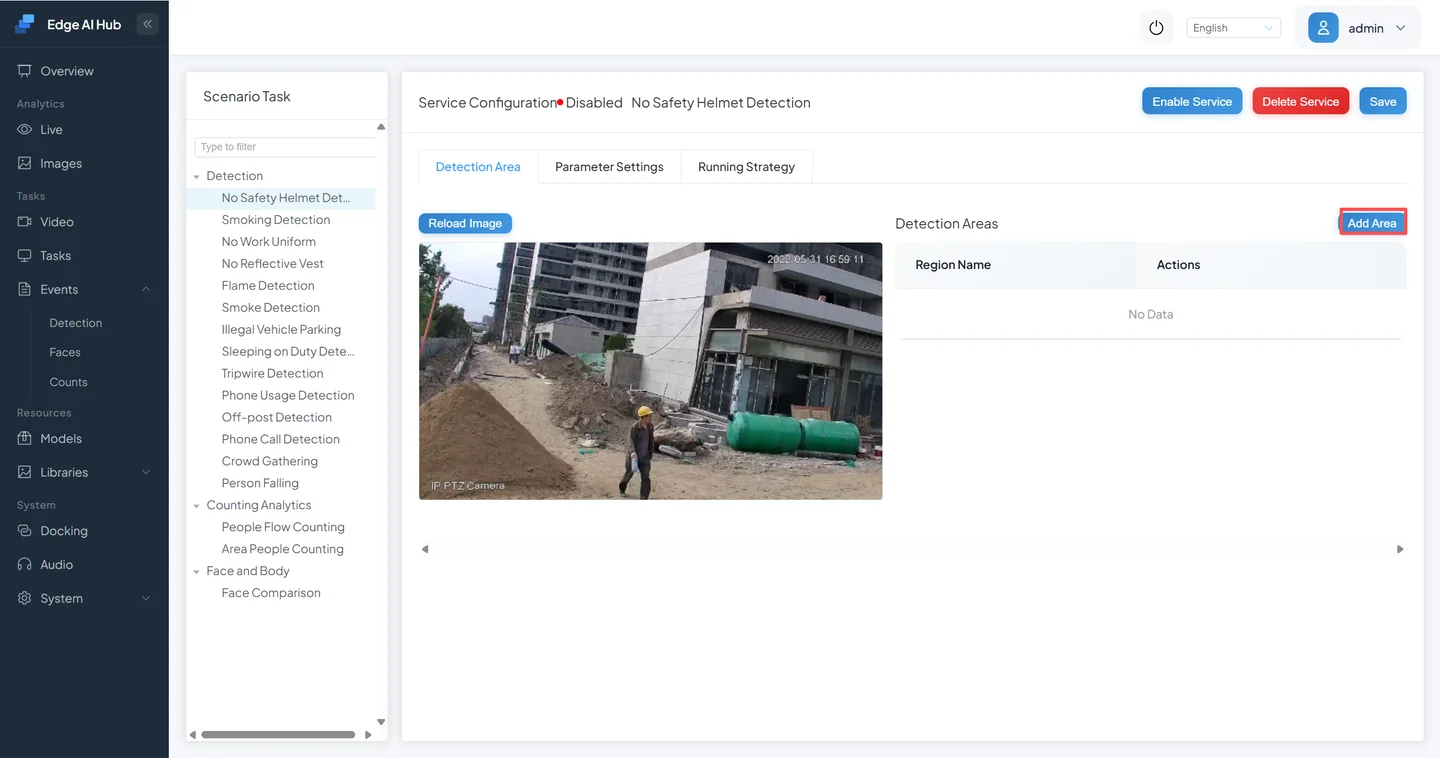
Set the region name.
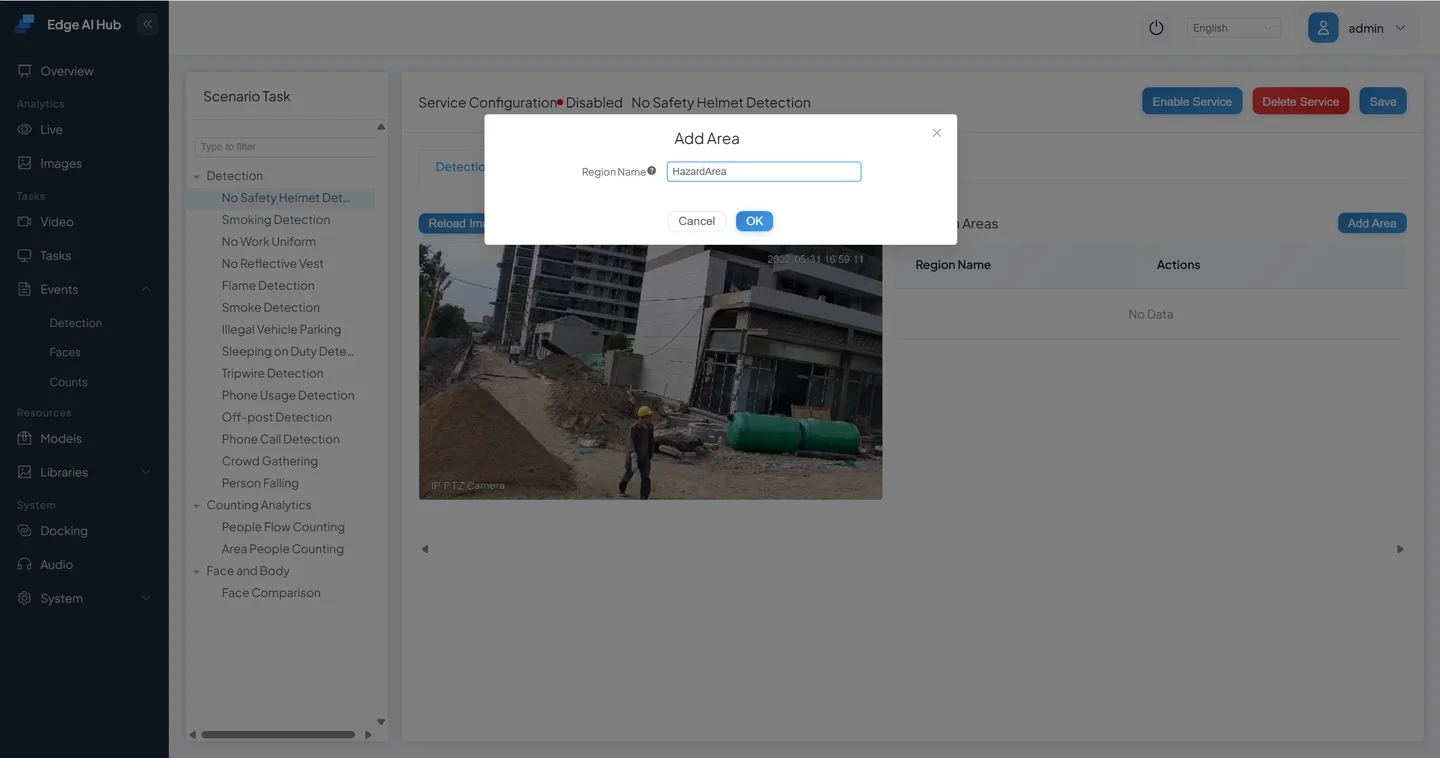
A six-sided adjustable detection region will appear over the video feed.
Adjust the region
Drag the region and its control points to fit the area of interest.
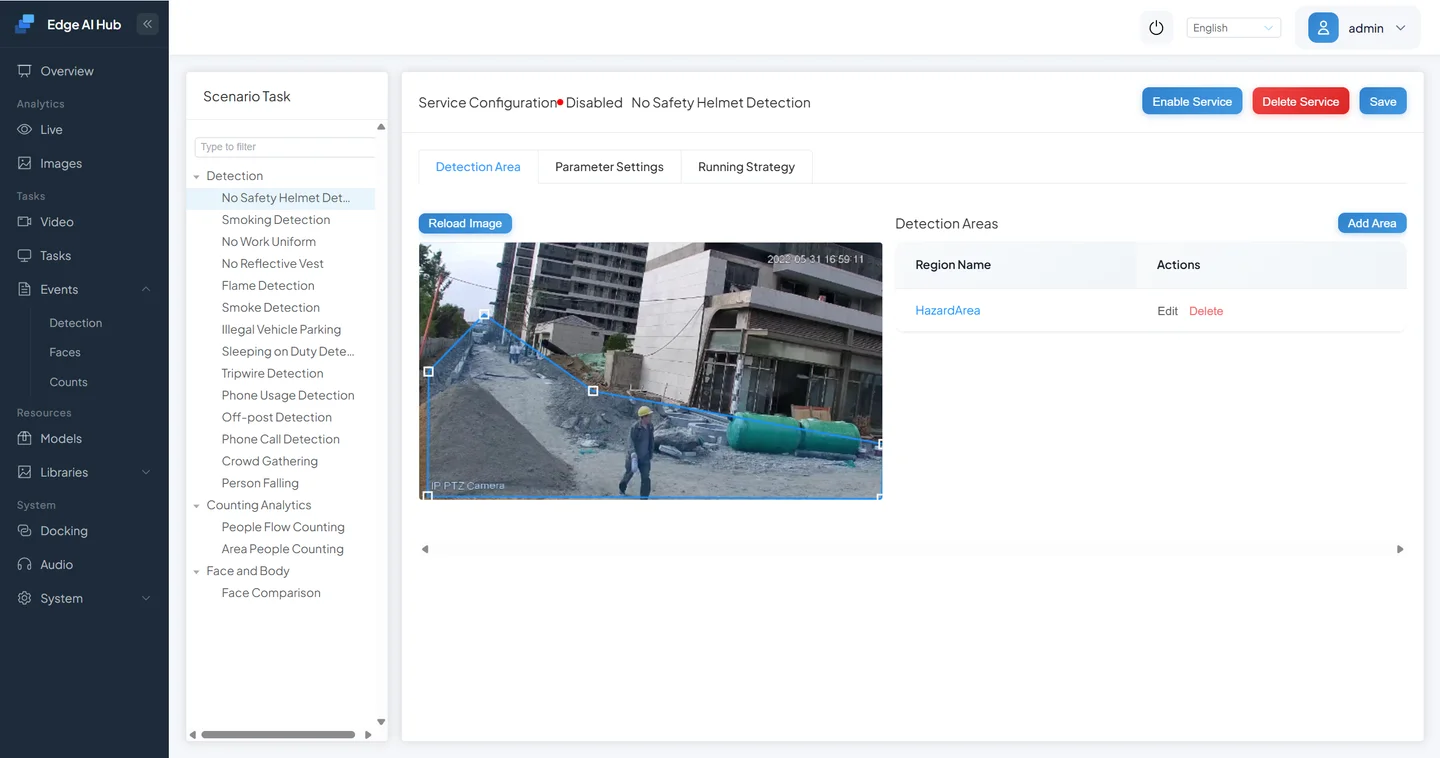
💡 Detection Region Tips
- Up to 4 independent regions are supported.
- Don't make regions too small — ensure that target personnel have enough pixel area within the region.
- If there are fixed sources of interference (like a safety poster featuring a hard hat), use regions to exclude them.
Only people inside the region will be checked for hard hat compliance. People outside the region are ignored, which significantly reduces false alarms and saves compute resources.
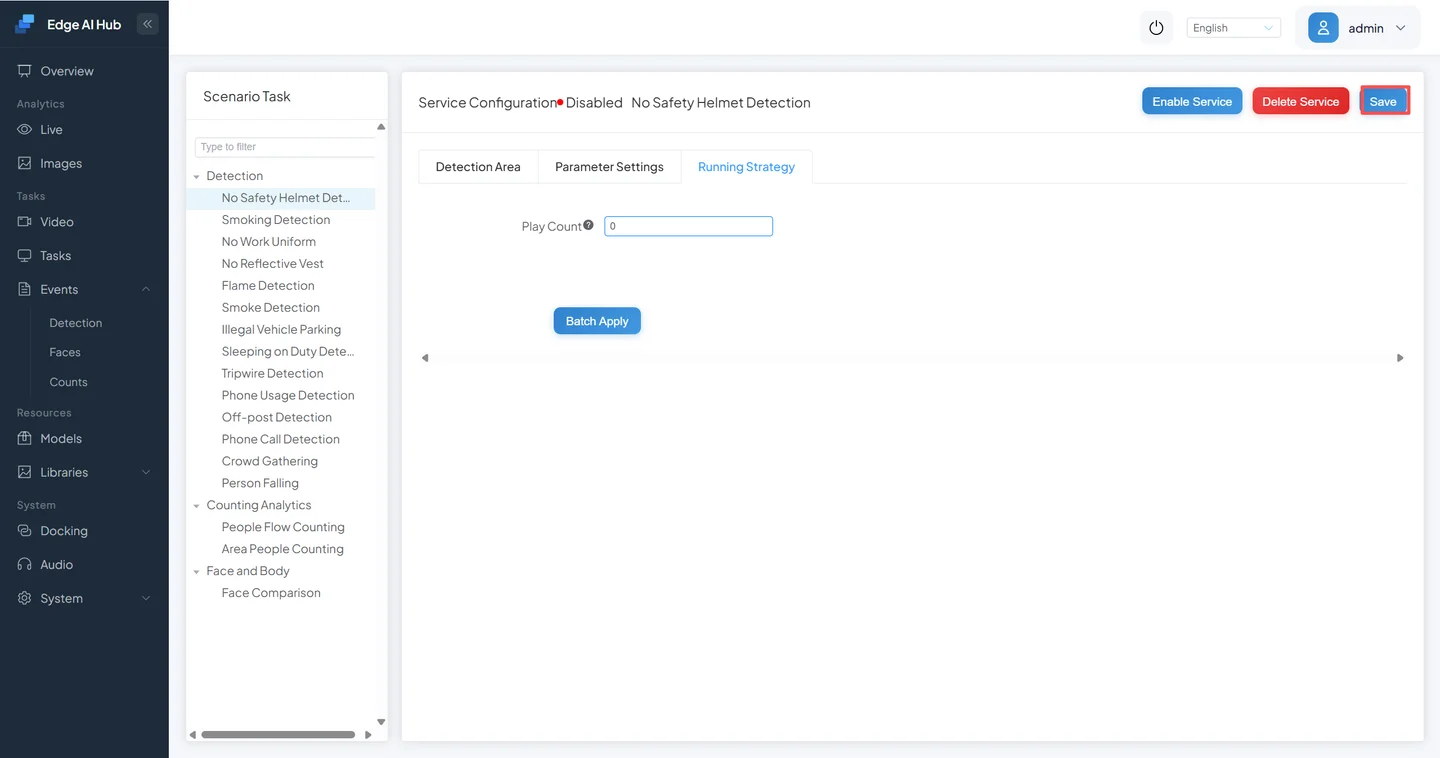
1.4 Tune Key Parameters
Open the algorithm's parameter configuration to adjust detection behavior for your specific scenario.
- Switch to the Parameter Configuration tab.
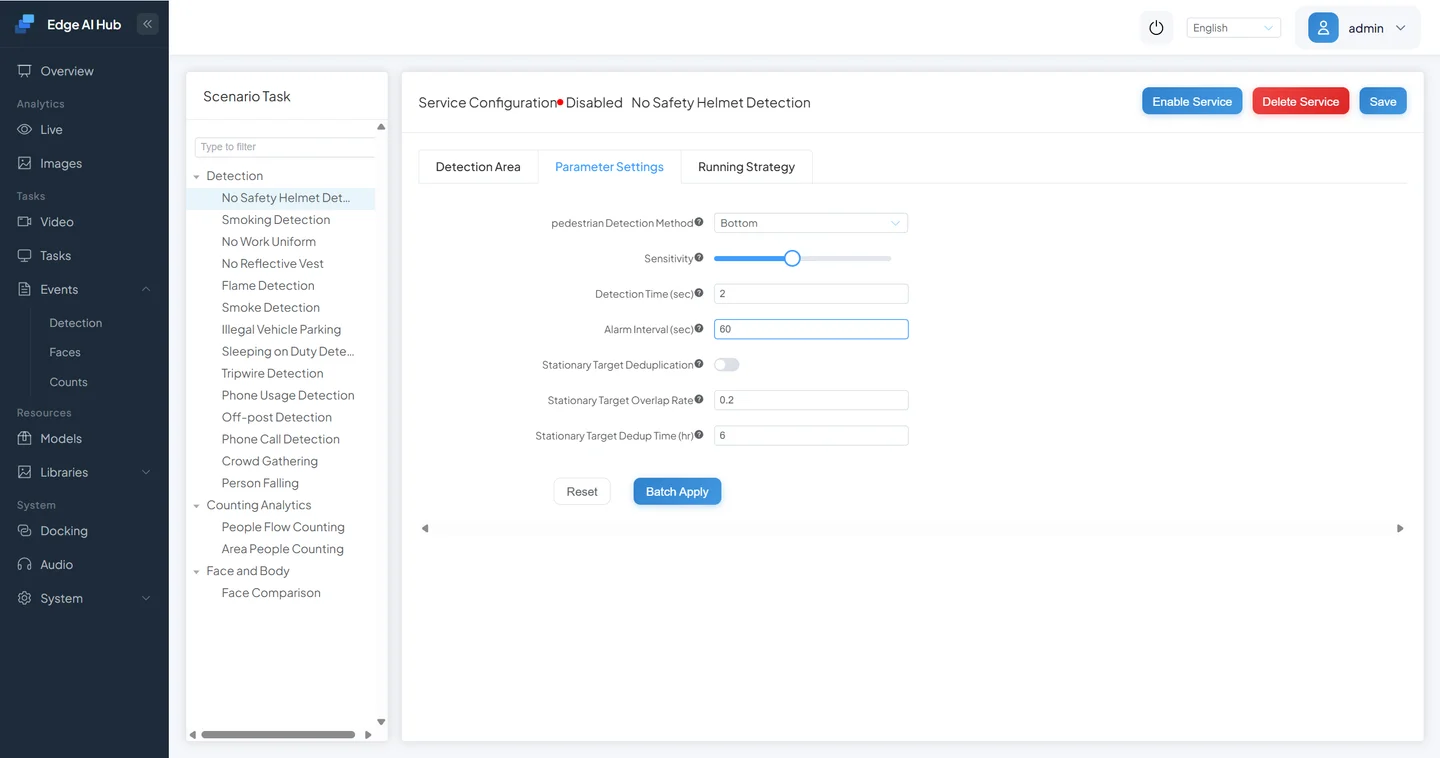
Here are the most commonly tuned parameters:
| Parameter | Description | Purpose | Default | Tuning Advice |
|---|---|---|---|---|
| Alarm Interval | Minimum interval between consecutive alarms (seconds) | Controls re-alarm frequency for the same ongoing violation | 60 sec | Set low (e.g., 10 sec) for demos; set high (60–120 sec) in production to avoid overload |
| Alarm Count | Maximum number of alarms per alarm type | Precisely controls total alarm output | 1 | |
| Static Object Dedup | Whether to filter long-stationary targets | Prevents repeated alarms on fixed objects | Off | Enable if there are static distractors (e.g., posters showing people) |
| Pedestrian Detection Mode | Defines which part of the bounding box triggers zone entry | Allows flexible entry-point selection |
- Configure the runtime strategy.
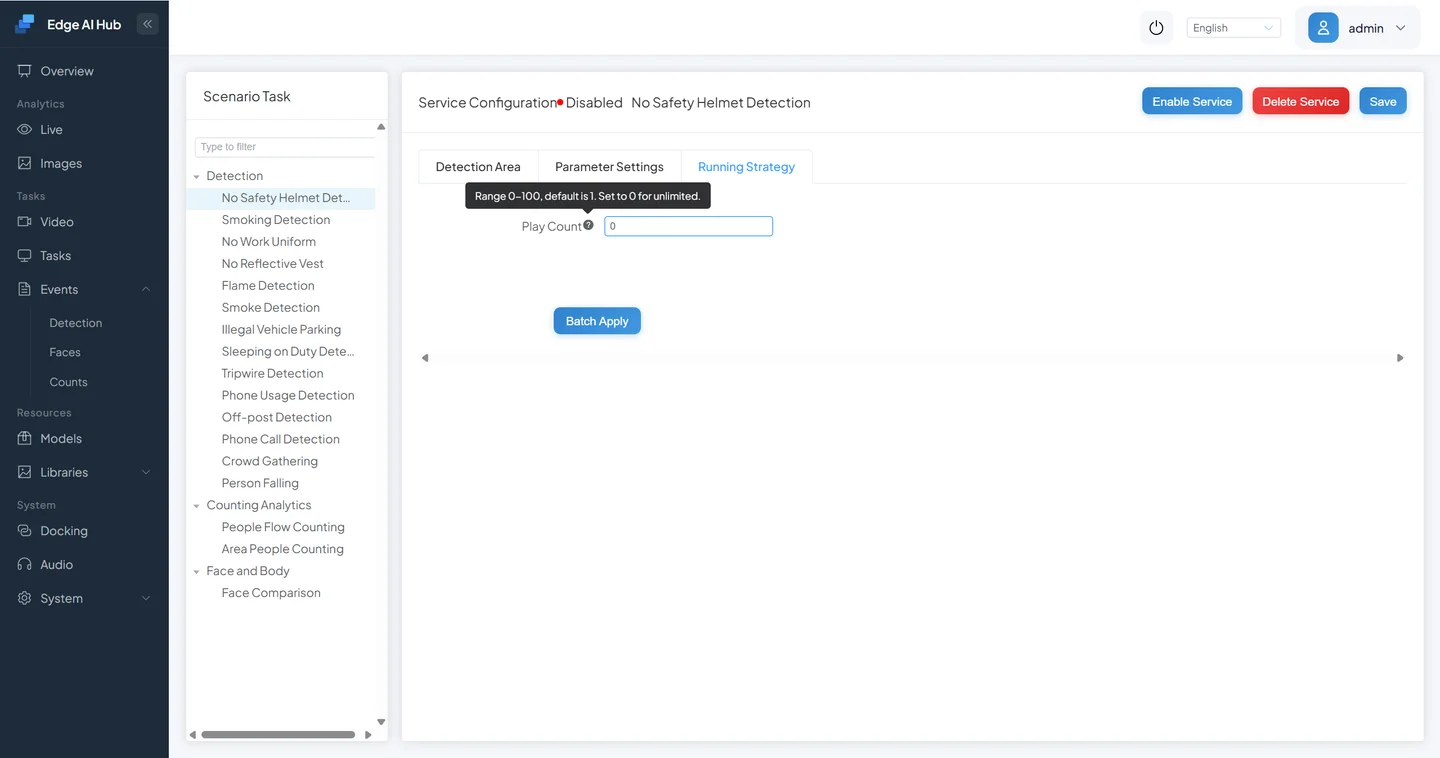
- Save.
Parameter settings overview:
- Alarm count set to 0 = unlimited alarms.
- Static object dedup enabled = stationary objects won't trigger repeated alarms.
- Sensitivity set to 3 = within a 10-frame window, 3 hits of "no hard hat" are required before triggering an alarm.
- Minimum pedestrian size set to 60 = pedestrians smaller than 60×60 pixels are discarded.
Verification method:
- Change the alarm interval from 60 seconds to 10 seconds.
- Go to Live Preview and watch whether the same hatless person triggers an alarm every 10 seconds.
- Once confirmed, revert to the recommended production value.
Saving also starts the service.
1.5 Algorithm Visualization
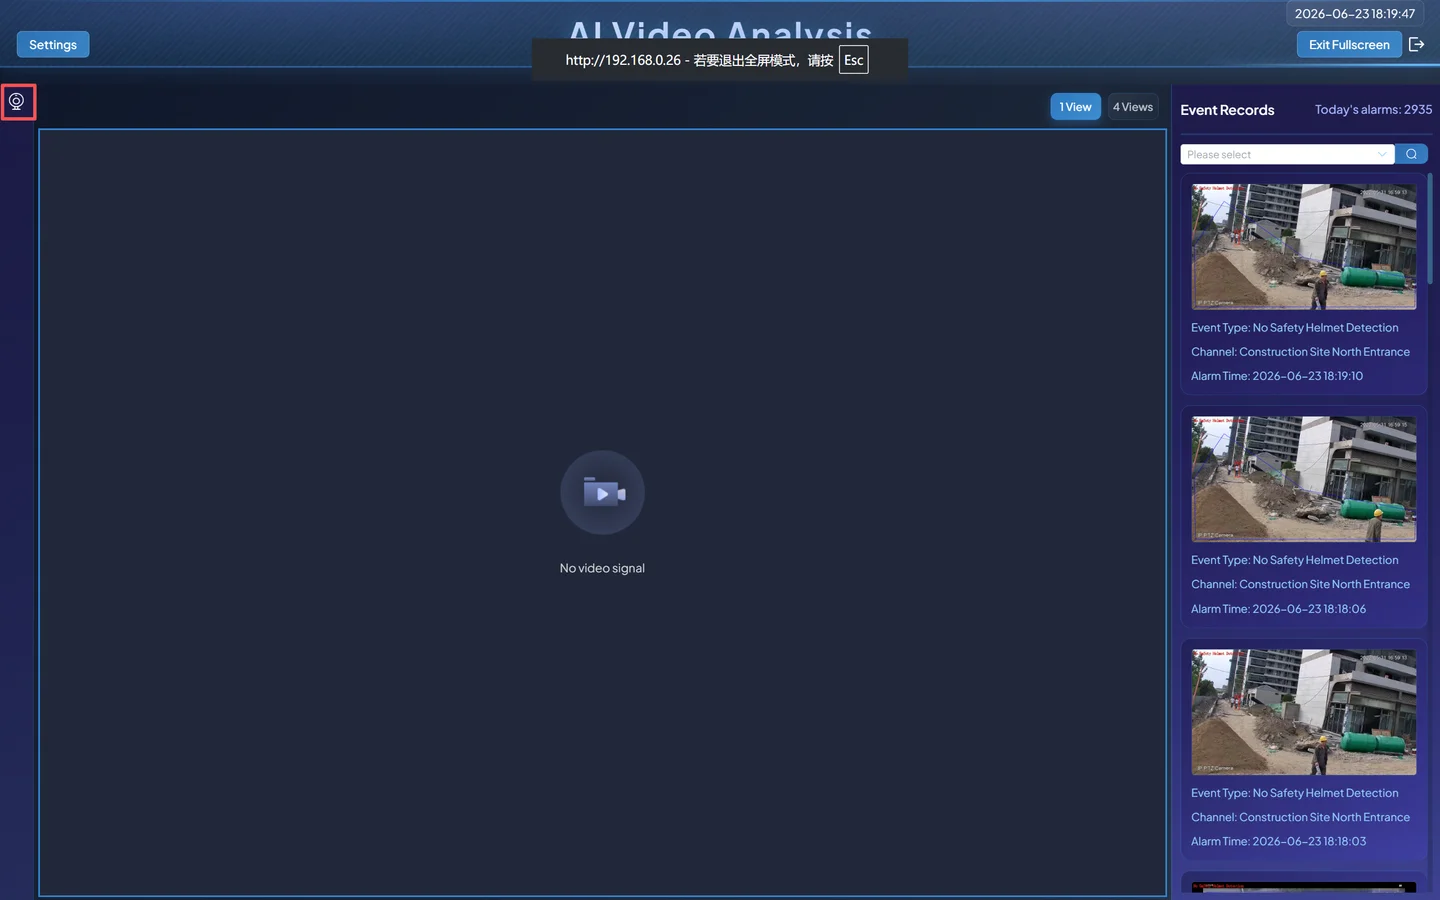
Real-time visualization makes the entire business workflow clearly visible.
- Click Live Preview to enter the visualization page.
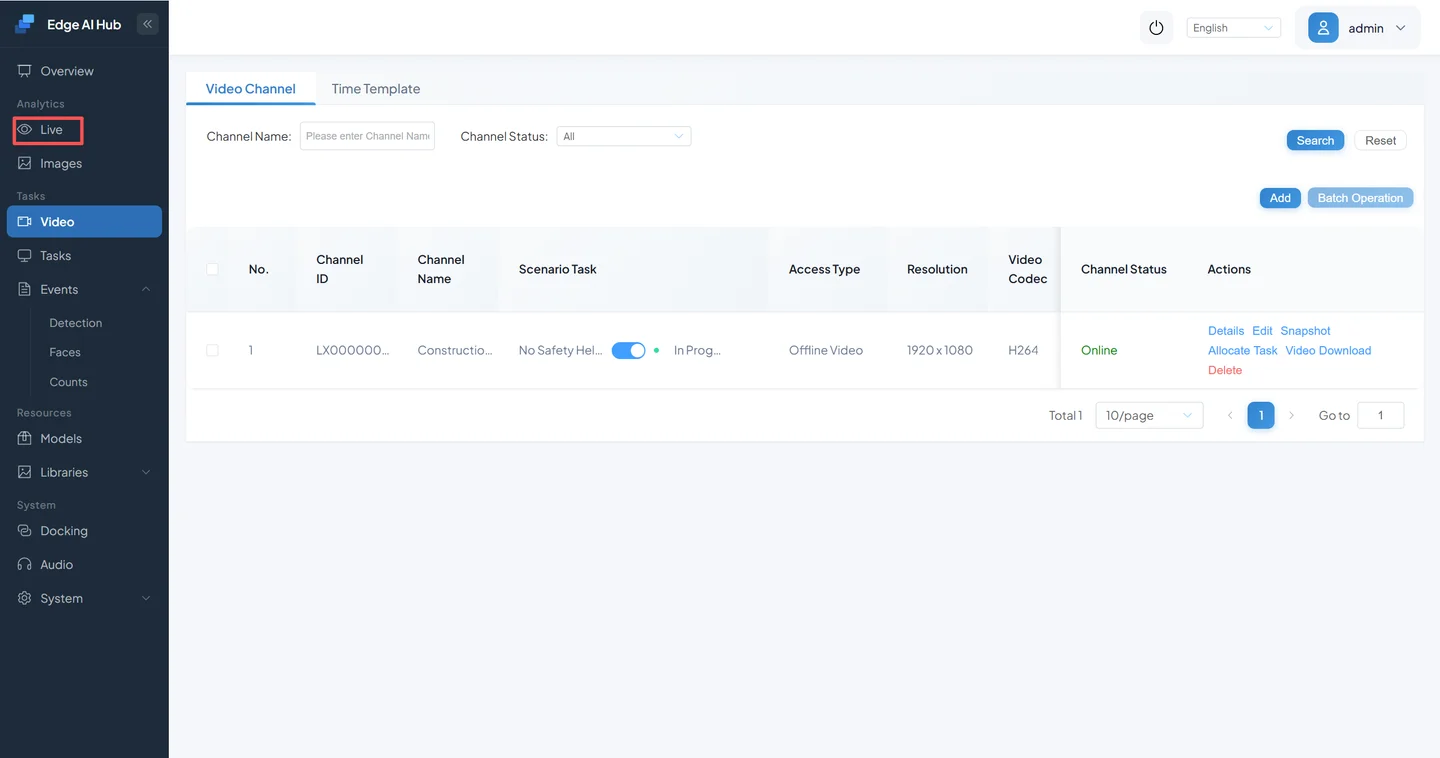
Click Channel Selection and choose the configured channel.
By default, no algorithm overlay is active. You can manually enable visualization overlays for different algorithms.
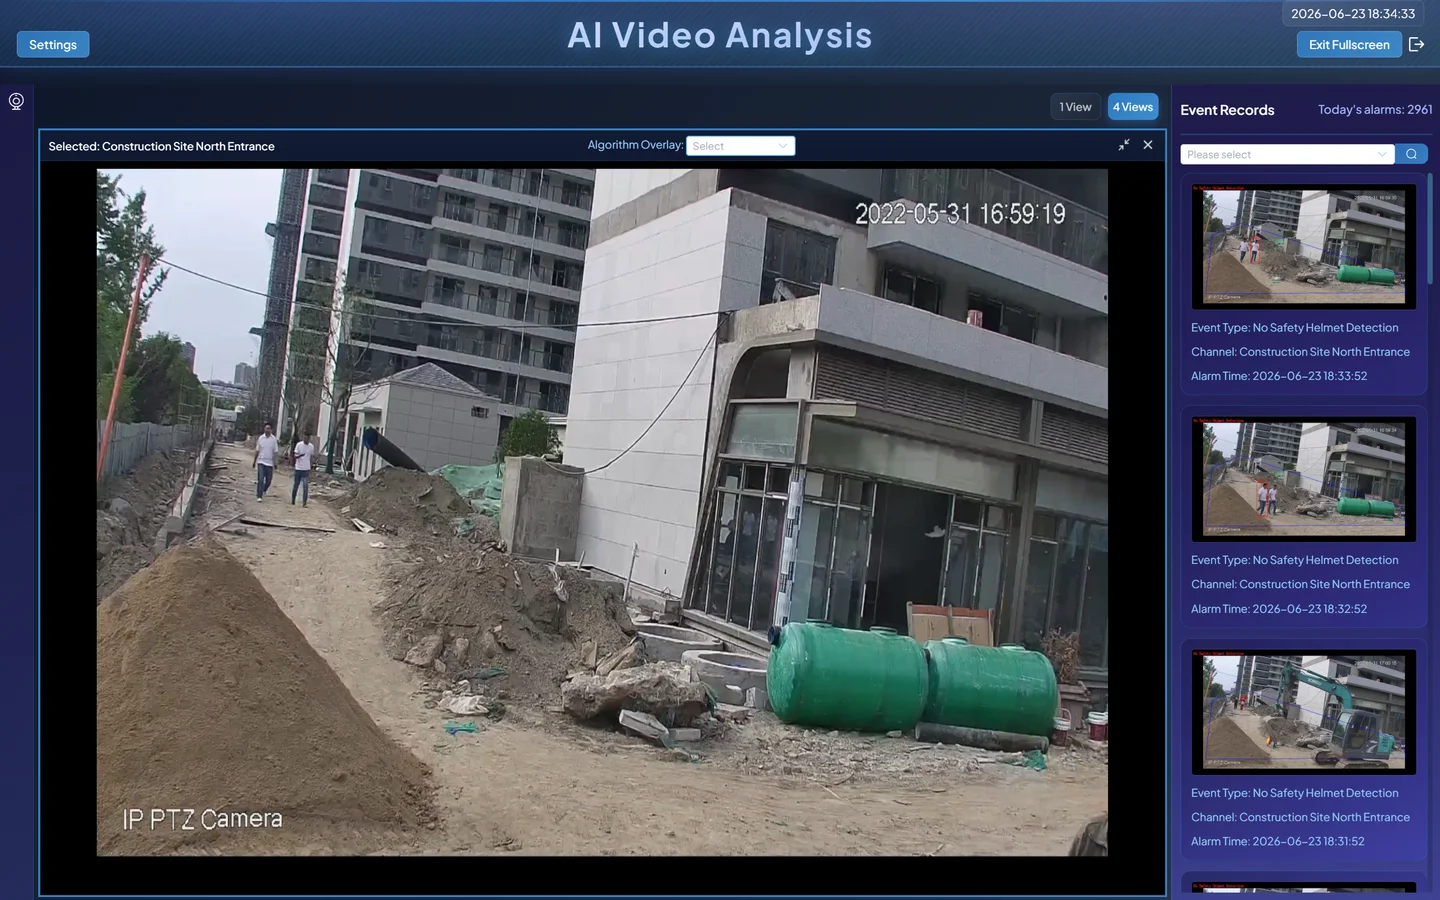
Select the No Hard Hat algorithm.
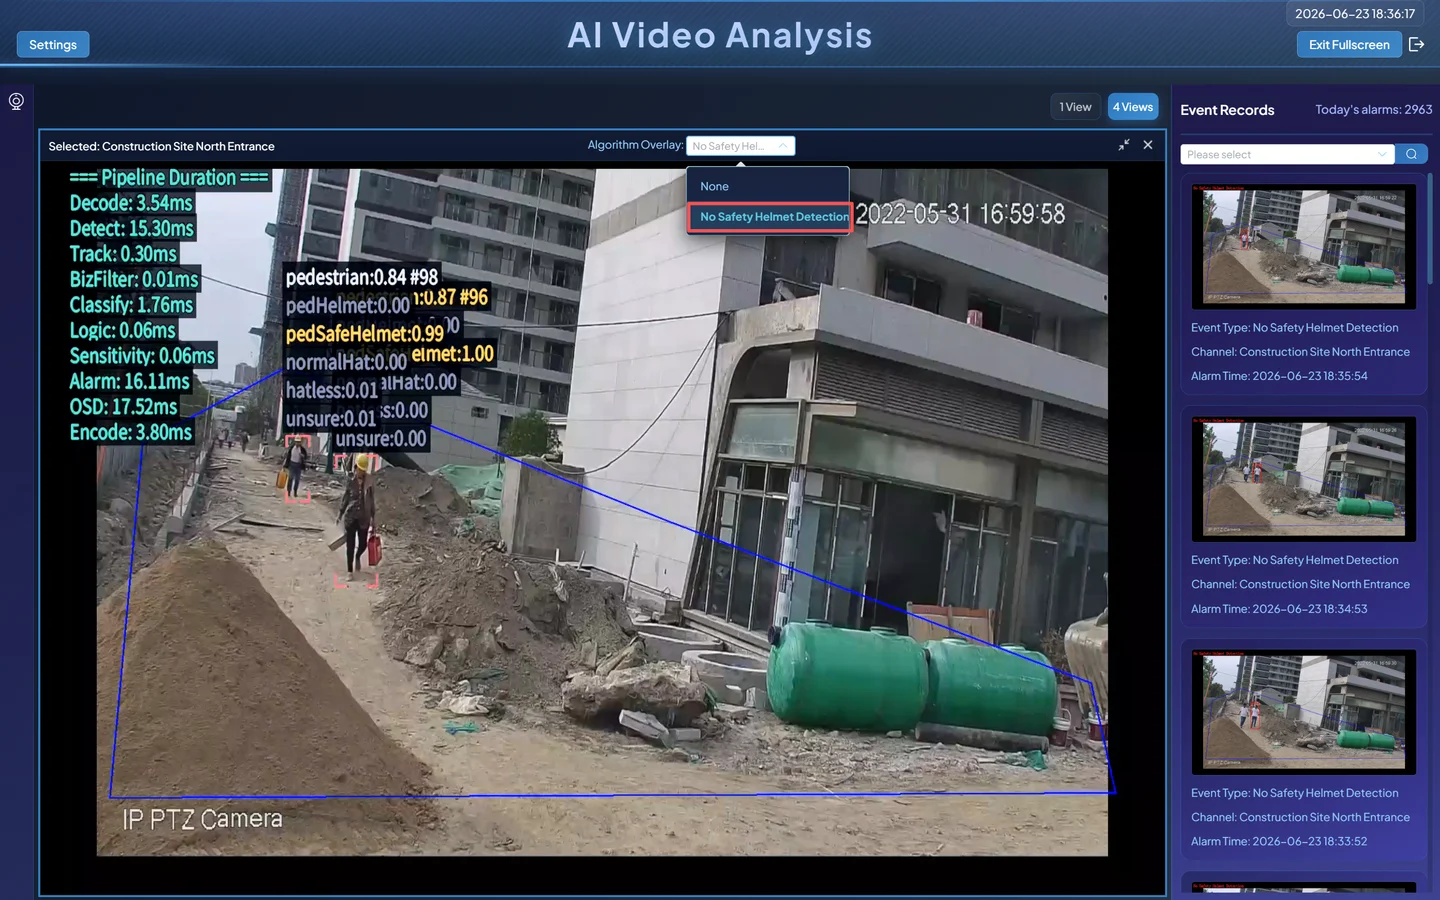
View the algorithm visualization.
Visualization elements:
- Prediction boxes: Detection model bounding boxes rendered on screen.
- Detection region: Visual boundary of the configured ROI.
- Pipeline timing (upper left): Per-component latency breakdown for performance monitoring.
- Alarm info (upper right): Alarm notifications appear here.
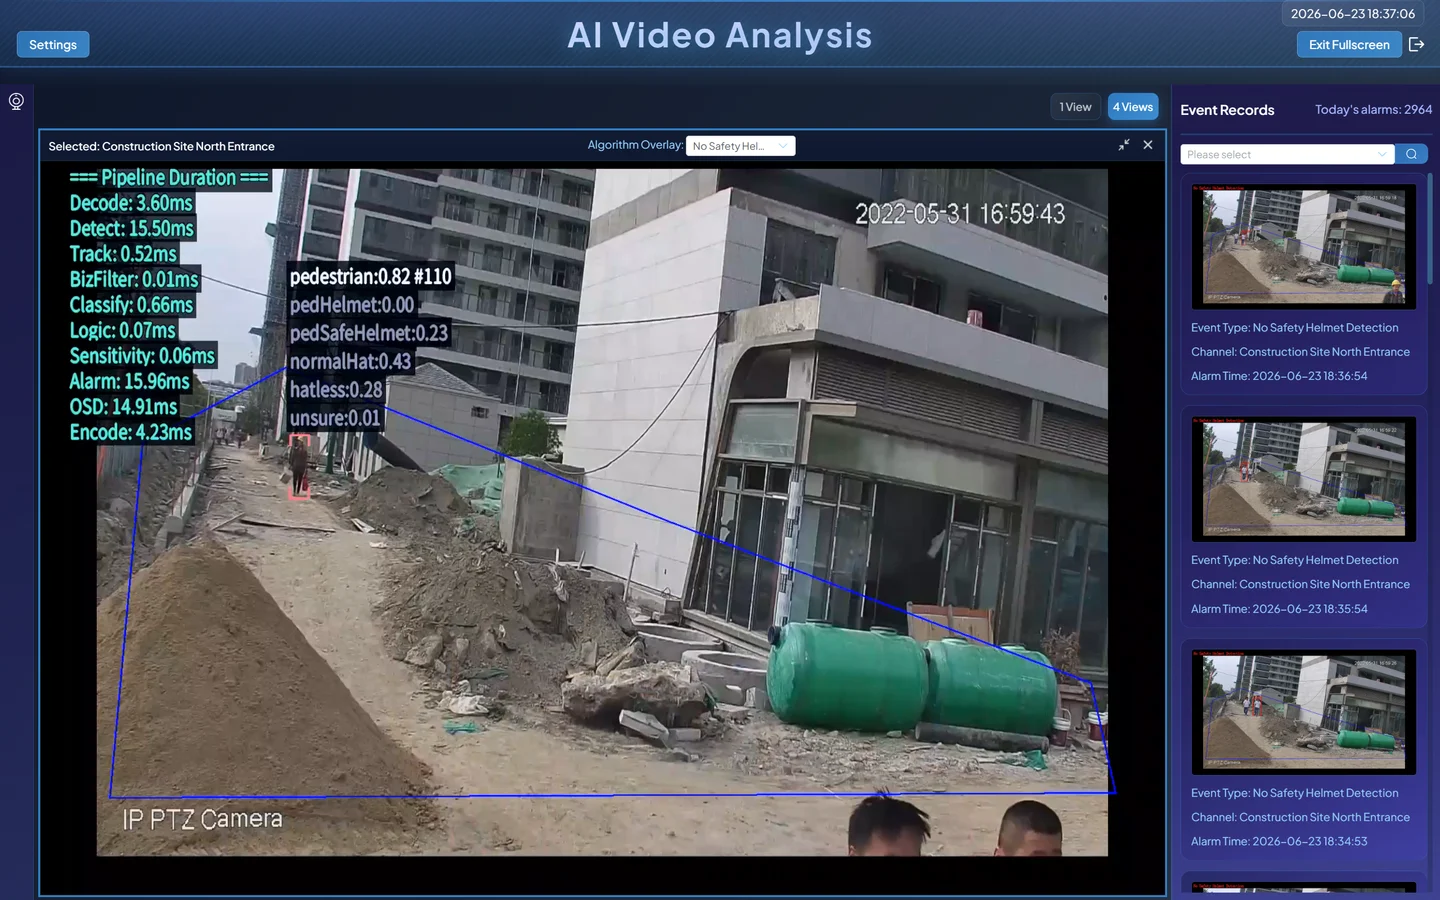
When a person without a hard hat enters:
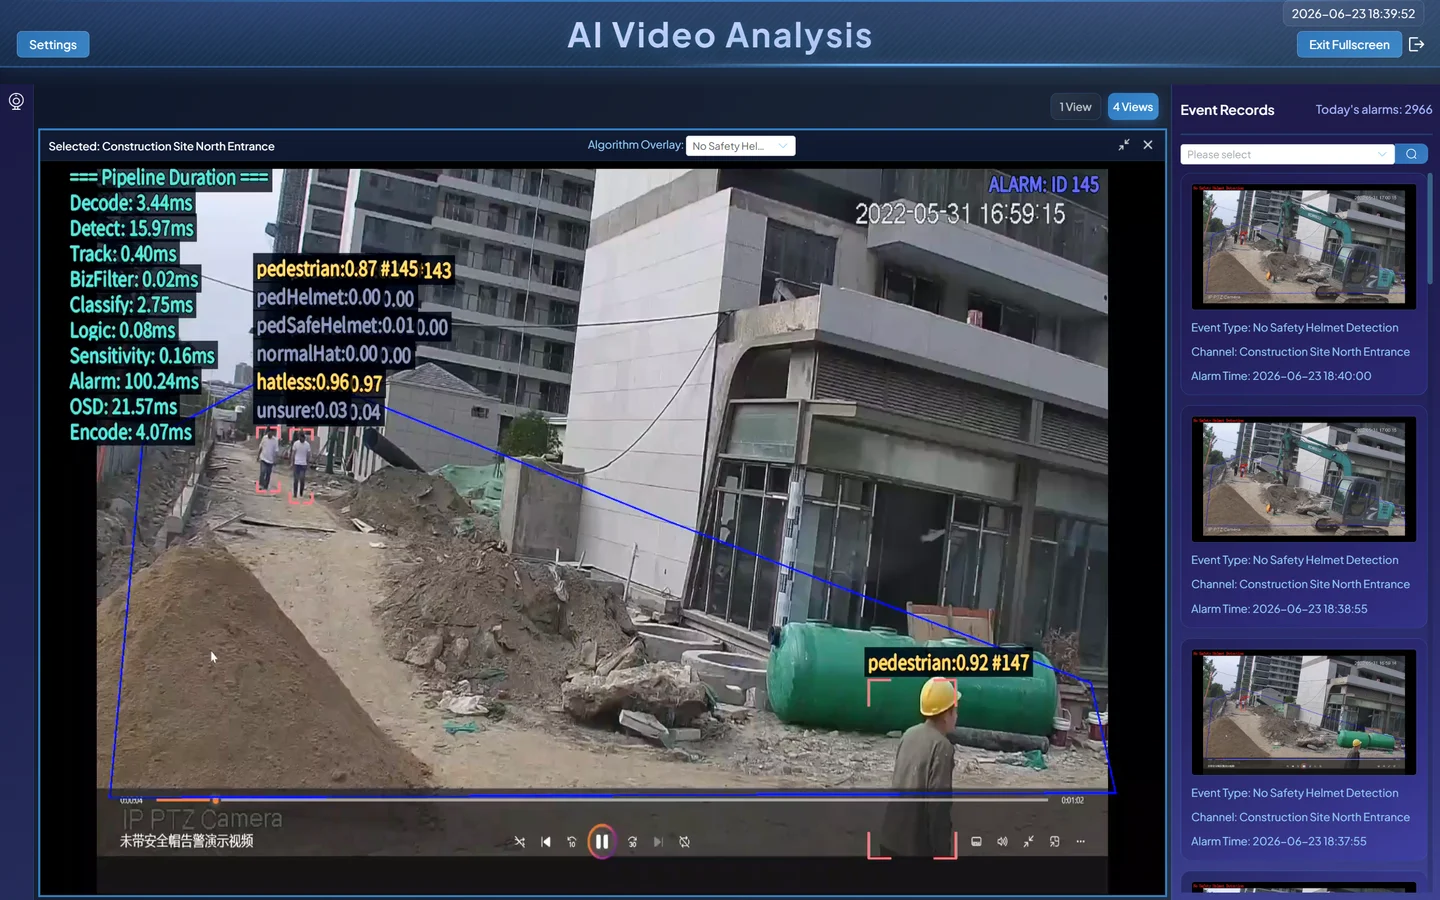
Classification only runs when a person enters the detection region. Each detected pedestrian is classified for hard hat status, with class labels and confidence scores overlaid:
pedHelmet: HelmetpedSafeHelmet: Safety hard hatnormalHat: Regular hathatless: No hatunsure: Uncertain
Here, hatless shows a confidence of 1.0, and an ALARM ID 178 notification appears in the upper right.
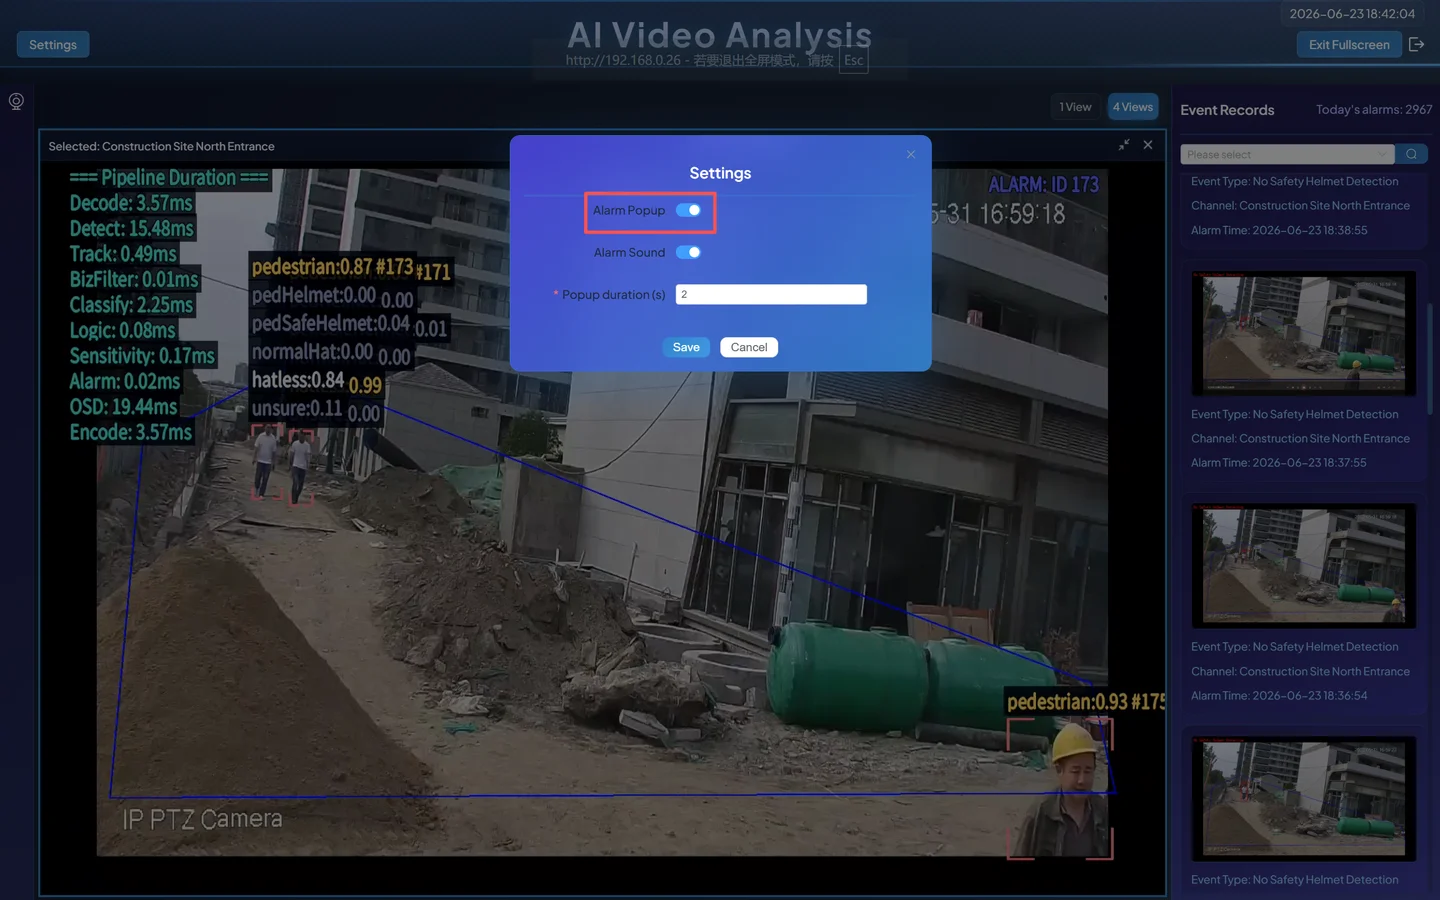
Alarm popup:
You can toggle this popup on/off via the settings icon in the upper left.
When a person wearing a hard hat enters:
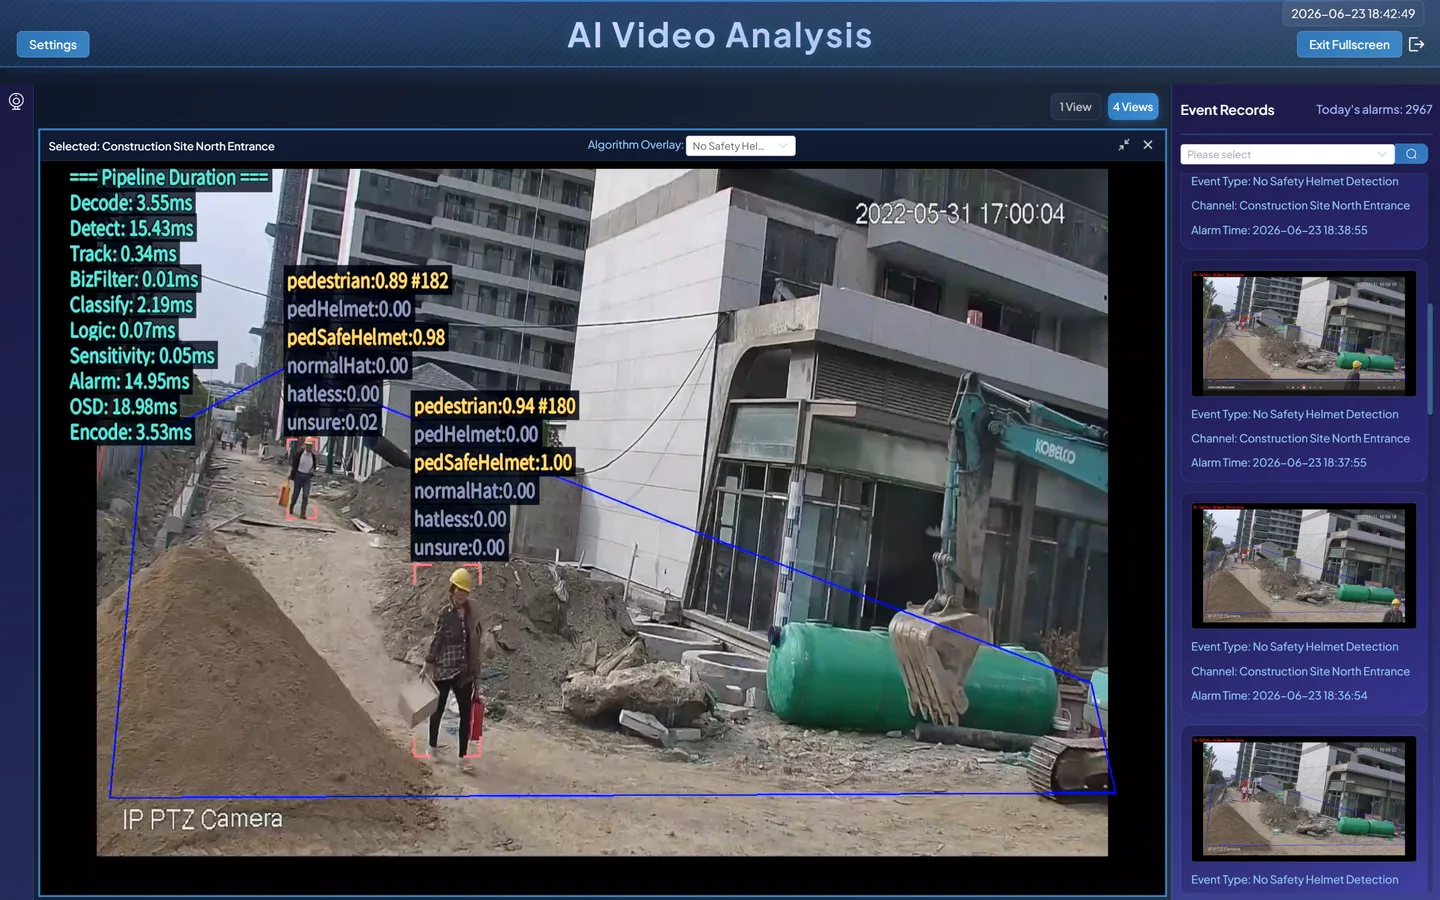
When pedSafeHelmet confidence exceeds the threshold, no alarm is triggered.
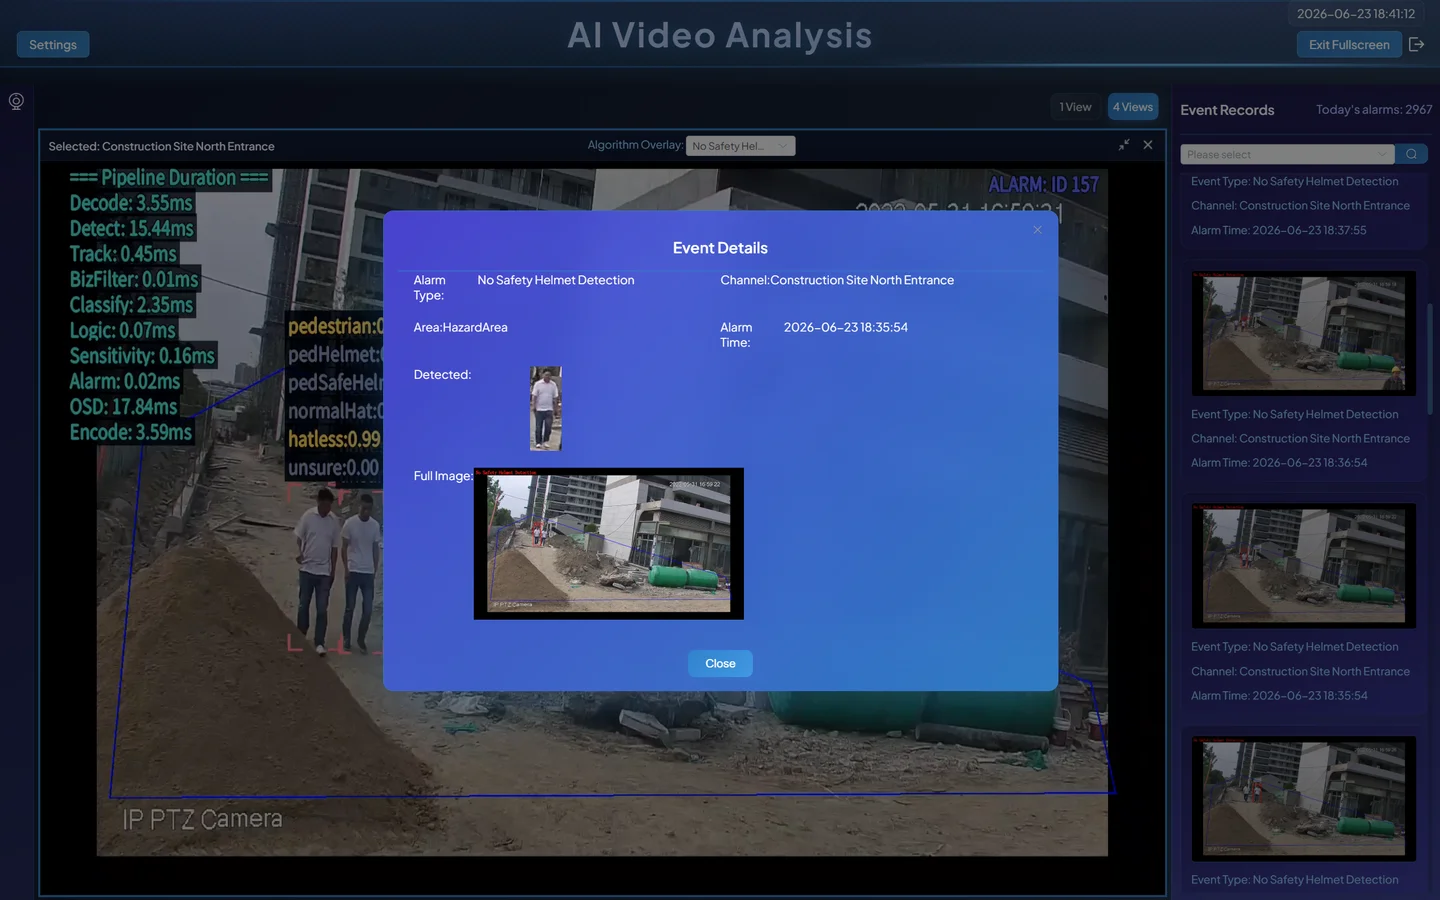
1.6 View and Export Alarms
Alarm data isn't just displayed in real time — more importantly, it's recorded as persistent alarm events.
Click Event Center → Detection/Analysis.
Open the alarm records page to view all generated alarms.
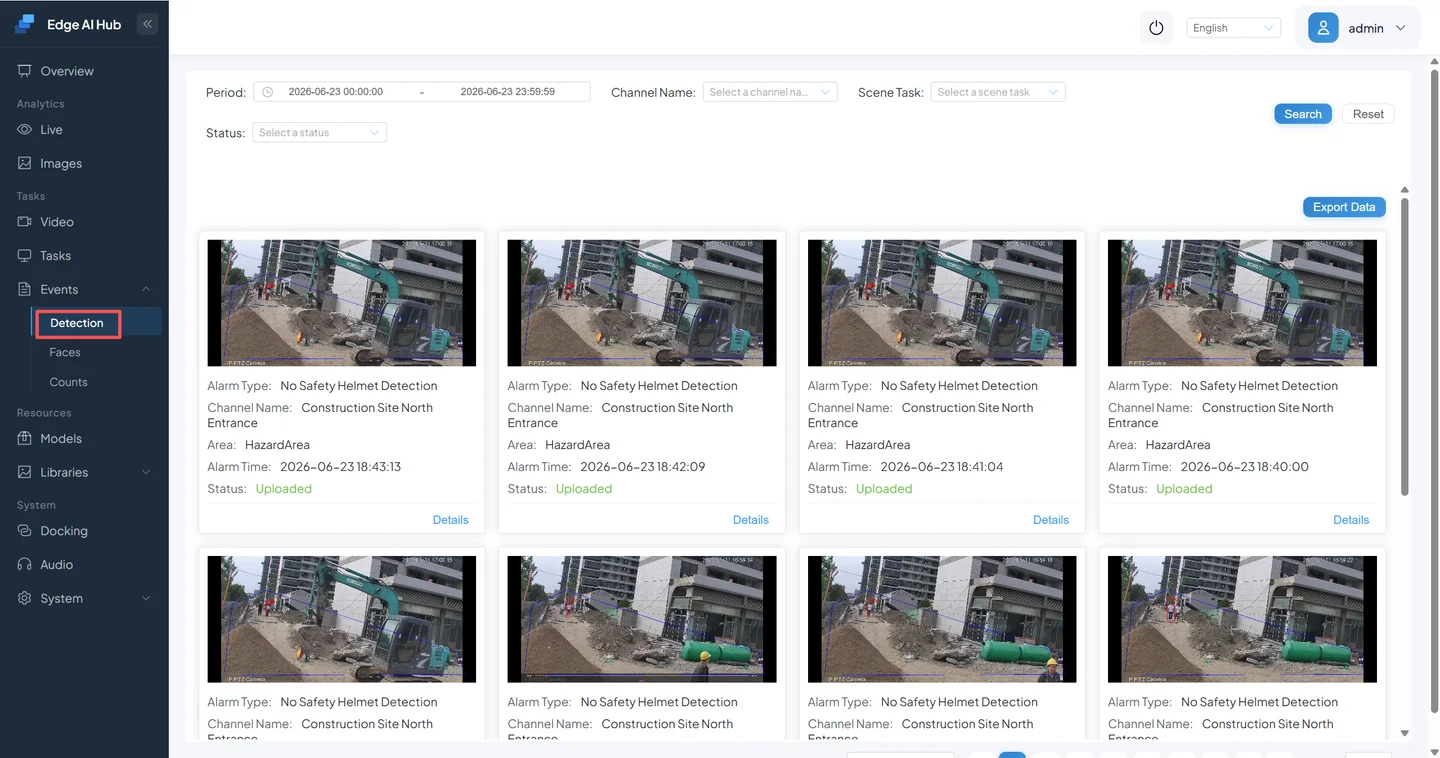
- Use filters to locate specific alarms:
- Channel name: Select the channel you just configured.
- Alarm type: Select "No Hard Hat."
- Time range: Select today.
- Status: Not uploaded.
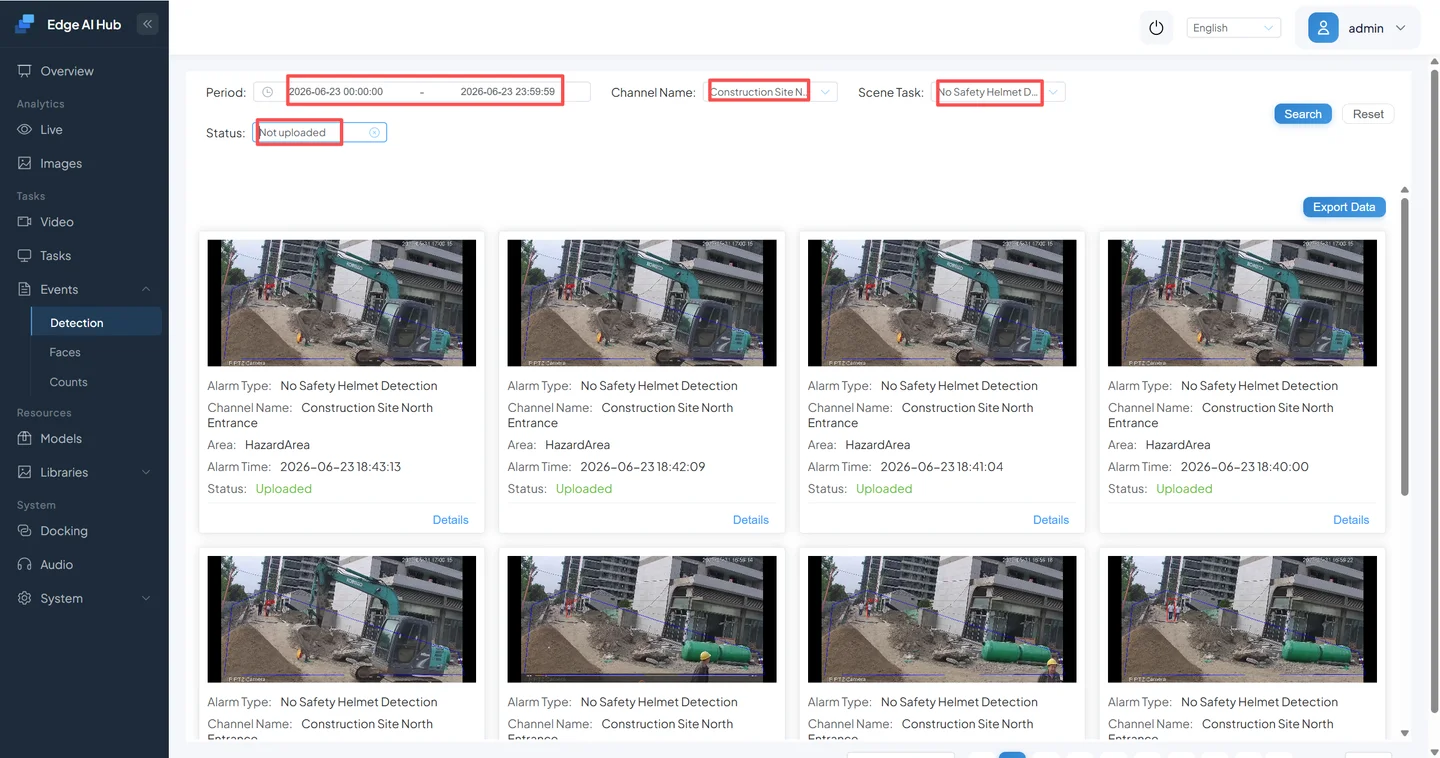
- Click an alarm's snapshot to view the full frame captured at the moment the alarm was triggered.

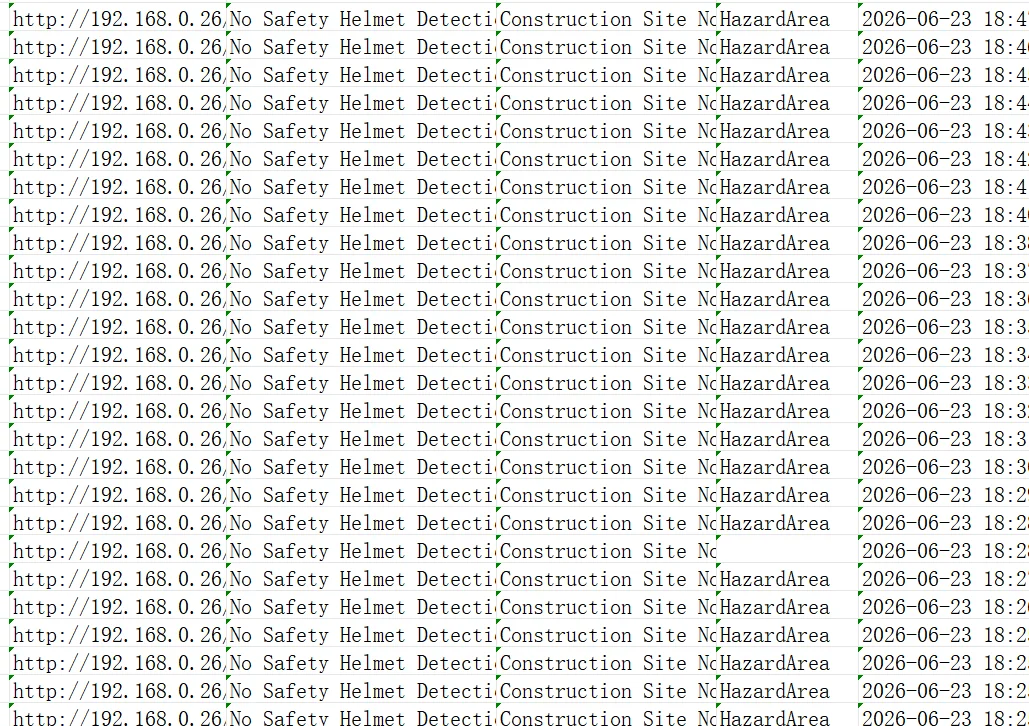
- To export data, click the Data Export button in the upper right.

The exported CSV file:
You've now completed a full hard hat detection scenario. Here's a recap of the workflow:
Video Source (prepare video feed)
    ↓
Service Assignment (bind "Hard Hat Detection" algorithm)
    ↓
Draw Detection Region (define the area of interest)
    ↓
Parameter Tuning (alarm interval / sensitivity)
    ↓
Live Preview (verify detection results)
    ↓
Event Query (review historical alarms)
Chapter 2: Absence Detection (Self-Guided Practice)
Background: Traditional supervisors can't watch every workstation 24/7 — there are always gaps between patrol rounds. AI-powered absence monitoring continuously tracks whether personnel are at their stations and instantly alerts when a post is unattended.
Scenario: Monitor a duty station. When personnel leave the designated area for longer than a set threshold, trigger an automatic alarm. Key difference from hard hat detection: This isn't just "detected = alarm." It's "continuously absent for a period of time = alarm" — introducing time-based judgment logic.
This chapter omits step-by-step screenshots. Follow the same workflow from Chapter 1 on your own:
2.1 Configuration Workflow
Follow the same path as Chapter 1:
- Prepare a video channel — Download the demo video.
- Assign an algorithm — Select the Absence Detection algorithm.
- Configure the detection region — Draw a region around the area that must be staffed (e.g., a front desk or guard post).
💡 Key difference from the hard hat scenario — the region means something different:
- Hard hat scenario: Region = only check for hard hats here
- Absence scenario: Region = someone must be here — alarm if nobody is present
2.2 Key Parameter Differences
Absence detection has different core parameters than hard hat detection. Focus on these:
| Parameter | Meaning | Recommended Value | Notes |
|---|---|---|---|
| Absence Time Threshold (how long before an alarm triggers, seconds) | Prevents false alarms from brief absences | 60–180 sec | Strict posts = shorter; flexible posts = longer |
| Alarm Interval | Same as the hard hat scenario | 300 sec | Absence is a continuous state — no need for frequent re-alarms |
| Person Count Threshold | Minimum number of people required in the region | 1 | Set to 2 for dual-staffed positions |
⚠️ If parameter names don't exactly match the table above Some parameters currently use technical names. Match them by value type and position. Display names will be standardized in a future update.
2.3 Verification
After configuration, verify the following:
- [ ] Person present in the station area: No alarm
- [ ] Person leaves the area, after the configured threshold: Absence alarm triggers
- [ ] Person returns to the area: Alarm stops; event record status updates
- [ ] Open Event Query and confirm absence alarm records appear
If all checks pass — congratulations! You've now mastered two distinct scenario configuration patterns.
Chapter 3: Quick Reference for All Scenarios
Below are all 18 built-in AI algorithm scenario tasks. Their configuration workflow is identical to the first two chapters (Video Source → Service Assignment → Detection Region → Parameter Tuning). The only differences are in applicable scenarios and key parameters.
The 18 algorithms fall into six categories: Construction Safety, Smart Office, Fire Safety, Community / Campus Security, Passenger Flow Counting, and Face Recognition.
Construction Safety
| Algorithm | Detection Target | Alarm Condition | Key Parameters |
|---|---|---|---|
| No Helmet | Person's head | No hard hat detected | Alarm interval, alarm count |
| No Reflective Vest | Person's upper body | No reflective vest detected | Same as above |
| No Work Clothes | Person's upper body | No work uniform detected | Same as above |
| Area Intrusion | People | Person enters a restricted zone | Region config (required) |
Smart Office
| Algorithm | Detection Target | Alarm Condition | Key Parameters |
|---|---|---|---|
| Sleeping on Duty | Body posture | Detected sleeping on desk / head down | Duration threshold |
| Leave Post | Personnel presence | Designated area unattended past threshold | Absence time, person count threshold |
| Phone Use | Hand activity | Detected using a phone | Alarm interval |
| Making a Call | Hand activity | Detected making a phone call | Alarm interval |
| Smoking | Person / smoke & fire | Detected smoking behavior | Sensitivity, alarm interval |
Fire Safety
| Algorithm | Detection Target | Alarm Condition | Key Parameters |
|---|---|---|---|
| Smoke | Smoke | Abnormal smoke detected | Sensitivity |
| Flame | Open flame | Flame detected | Sensitivity |
Community / Campus Security
| Algorithm | Detection Target | Alarm Condition | Key Parameters |
|---|---|---|---|
| Person Fall | Body posture | Fall detected | Duration (to distinguish squatting) |
| Crowd | Area person density | Person count in area exceeds threshold | Person count threshold, duration |
| Illegal Parking | Vehicles | Vehicle stays in no-parking zone past limit | Region config, dwell time |
| Tripwire | People / vehicles | Crosses a configured tripwire | Tripwire config, direction |
| Area Headcount | Person count in area | Area headcount / over-threshold alarm | Region config, person count threshold |
Passenger Flow Counting
| Algorithm | Detection Target | Output | Key Parameters |
|---|---|---|---|
| Passenger Flow | People | Entry/exit count totals | Line position, direction |
Face Recognition
| Algorithm | Detection Target | Output | Key Parameters |
|---|---|---|---|
| Face Recognition | Faces | Identity matching results | Gallery config, similarity threshold |
💡 Choosing the Right Algorithm
- You don't need to configure all algorithms at once. Start with 1–2 scenarios most relevant to your business and run through the full workflow.
- For detailed parameter documentation, see the Reference Manual — Parameter Guide.
- If none of the 18 algorithms cover your use case, check out the VLM Visual State Judgment Guide (Volume 3) — VLM lets you define new detection rules by writing a single sentence, no model training required.
What's Next
| Goal | Read |
|---|---|
| Use VLM to define entirely new detection rules with a single sentence | → VLM Visual State Judgment Guide (Volume 3) |
| Look up parameter details or troubleshoot issues | → Reference Manual |